Weekend Recap

If you reside in the Bluegrass or really anywhere in the Upper-South/Mid-Atlantic region, then you were probably snowed in for much of the weekend like we were. During January and February, I relish snow days and think they are good for the soul. They force people to slow down and take some time to rest from the normal bustle of life. However, by March, I definitely have spring fever and am ready to be outside without having to bundle up.

Other than heading out for the UK vs. Vanderbilt basketball game on Saturday, we spent much of the weekend playing in the snow, curled up with hot beverages and books, and eating comfort food.

On Friday, I was so tempted to make a big batch of chocolate chip cookies, but I satisfied my baking bug by making this honey wheat bread. However, by Sunday, I couldn’t hold out any longer and just made some cookies. I also made a big batch of The Pioneer Woman’s potato soup that we’re still enjoying. I substituted milk for half of the heavy cream in the recipe, and I think it still tastes decadent.

Here are some scenes I snapped of our weekend:

IMG_0117

Where did all the squirrels go?

IMG_0118

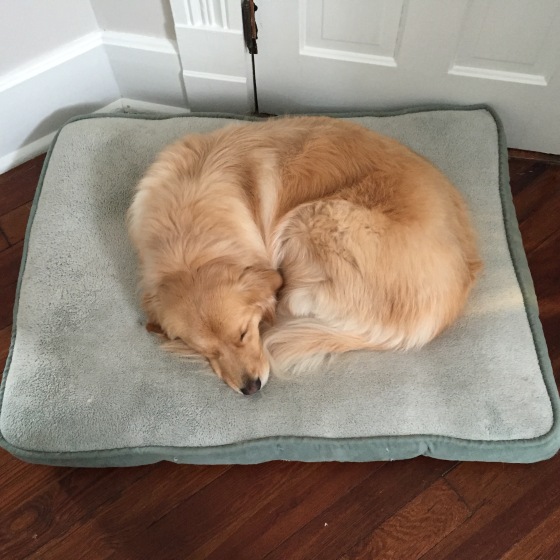
We did a lot of this after playing in the snow.

IMG_0121

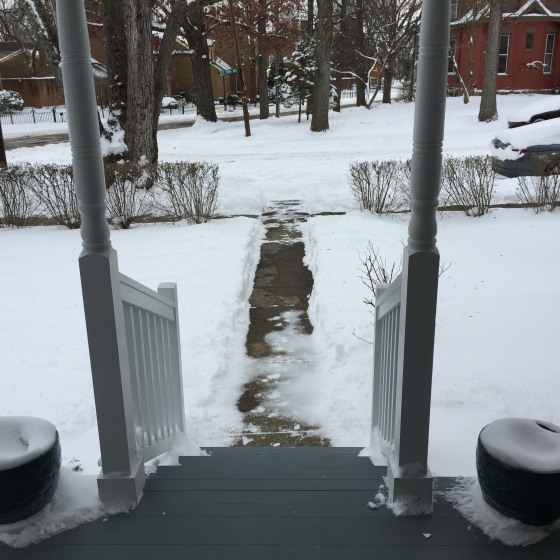
The view from our front porch. Jay won the neighborhood superlative for best shoveled sidewalks.

IMG_0115

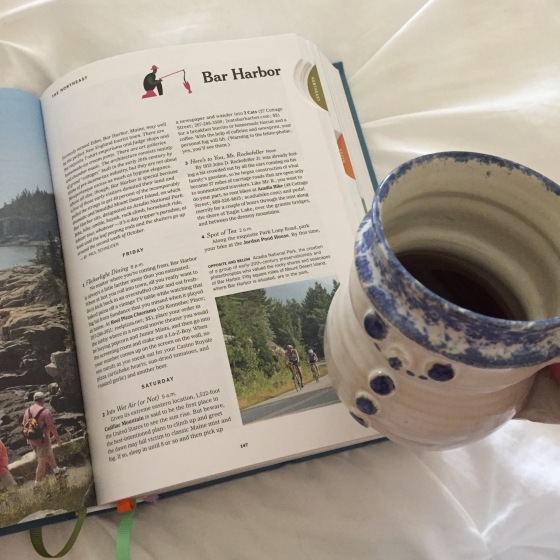
Spent some time planning a girls’ trip to New England this summer. I’m most excited to visit Maine!

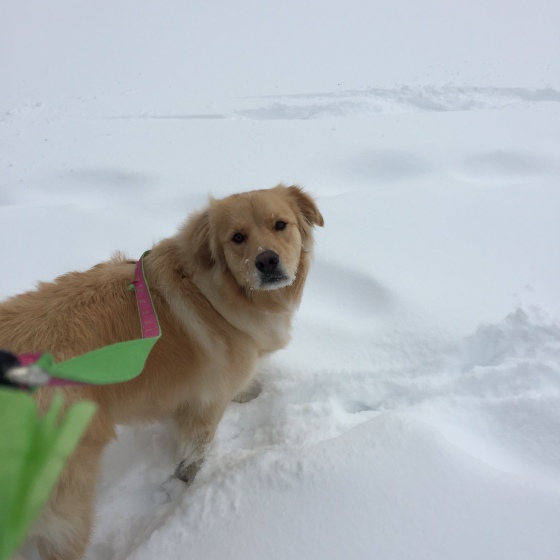
We also stopped by the Bluegrass Barkery this weekend to pick up some of these Pawz booties and a few treats. After a light snow last Wednesday and the snowstorm this weekend, the pads on the bottom of her paws were getting red and irritated from the ice and salt. These little booties were great to put on her before walks and playing in the snow. She normally doesn’t like wearing anything, but she tolerated these better than I anticipated. The booties are reusable and disposable, so they come in packs of 12. Annabelle wore the same booties for several days, and they are still in good shape. The pack will definitely last all winter and possibly even into next winter. If you have a dog that you walk frequently, I definitely recommend these booties!


I hope you’re well rested and ready to take on the week! Cheers!

Laura

My Old Kentucky Home Renovations: Foyer and a Plea for Help

You may remember the December bucket list I put together about a month ago. I’m happy to report that I completed everything except creating a piece of artwork to hang in my home. Time just got away from me, and this goal fell by the wayside. When I wrote that to-do item down, I envisioned making a large statement piece to hang in our foyer because it is lacking in organization, inspiration, cohesion… You get the picture.

Anyways, over the next couple of months, I’d like to whip our foyer into shape. Unfortunately, it has become the “catch all” spot, and you can see the mess from almost every other room in our house. It has a lot of square feet and really great lighting, so it has the potential to be a great entrance to our house.

I’m hoping that I can share some “after” pictures with you by the end of February. Here are the “before” pictures in its current state.

As you can see, we’re doing a little work on the plaster above the fireplace, so it is a little more messy than normal. It is a relatively blank canvas, and I painted it in Sherwin-Williams Drift of Mist this past winter.

Here are some challenges to the space:

  1. Budget – I’d like to keep everything under $300.
  2. Attachment to existing items – Jay has a sentimental attachment to some of the furniture, so we’ll have to come of with a creative way to create a cohesive look. Did you see that little orange school room desk? Yikes!
  3. Little wall space – While the space is large, there are 4 doors or hallway entrances, 2 windows, and a fireplace.
  4. Visibility – Besides being the first room you encounter, it is visible from everywhere on the first floor except the kitchen, so it needs to match the rest of the house.

I’d love to hear your thoughts and suggestions on how to improve this space!

Cheers!

Laura

Holiday Hosting and Raspberry Trifle

2015-11-19 11.40.36

This weekend, we hosted some of our extended family for a Christmas lunch. The first holiday meal I ever hosted was a Christmas gift exchange with my high school girlfriends. Of course, my mom did most of the the planning and grocery shopping, and over the years I’ve learned much more about hosting meals, parties, and tailgates thanks to LOTS of advice from my mom and LOTS of trial and mostly error.

I’m by no means an expert, but here are the key tips I’ve learned from hosting – whether it is a smaller dinner party or a large bash.

  1. Keep the menu simple: I like to plan my menu around food that I’ve made several times before. This way, I know the food will taste good, and I won’t have a melt down minutes before guests arrive since it’s harder to botch a familiar recipe.
  2. Do as much work ahead of time as possible: Two nights before the event, I created my tablescape, set out my serving dishes, washed the holiday china, and prepared any food that I could get a head start on. The day before, I cleaned the house (minus the kitchen). This meant that on Sunday morning, I was only responsible for popping a couple of dishes in the oven, doing a light spot cleaning and vacuuming, and putting final touches on everything.  
  3. Delegate tasks if it makes sense: Since this was a smaller family gathering, I didn’t feel bad asking people to contribute. My brother-in-law brought the wine and each couple brought a side dish. Generally guests want to bring something or help in some way, so if the situation is appropriate, I encourage it and give them a guideline, such as, “It would be great if you could bring a salad.” Then I know that I don’t need to prepare a salad, and the generous guest knows they won’t be duplicating a menu item I’ve already made. Being fairly general also gives them autonomy to put their personal spin on the dish.

Here’s the menu I planned for our Christmas lunch:

Appetizer: Beaten biscuits with country ham

Main: Beef tenderloin, salad (brought by guest), green vegetable (brought by guest), mashed potatoes, and rolls

Dessert: Raspberry trifle, assorted homemade Christmas candy

Raspberry Trifle Recipe

This is the same dessert I made for my girlfriends in high school. It is a go-to recipe because it looks pretty and festive,  is easy to assemble several hours before guests arrive, and is practically no-fail.

  • 1 1/2 cups heavy cream
  • 1/4 cup white sugar
  • 2 (8 ounce) packages cream cheese, softened
  • 2 teaspoons lemon juice
  • 1 1/2 teaspoons vanilla extract
  • 1/2 cup white sugar
  • 1 (10.75 ounce) package prepared pound cake*
  • 2 (10 ounce) packages frozen raspberries, thawed**
  • 2 tablespoons unsweetened cocoa powder, for dusting
  1. In a medium bowl, beat cream with 1/4 cup sugar until stiff peaks form. In another bowl, cream together cream cheese, lemon juice, vanilla and 1/2 cup sugar. Fold 2 cups of whipped cream into cream cheese mixture. Reserve remaining whipped cream.
  2. Slice pound cake into 18 – 1/2 inch slices. Drain raspberries, reserving juice. Line the bottom of a 3 quart glass bowl or trifle bowl with one-third of the cake slices. Drizzle with some raspberry juice. Spread one-fourth of the cream cheese mixture over cake. Sift one-fourth of the cocoa over that. Sprinkle with one-third of the raspberries. Repeat layers twice. Top with remaining cream cheese mixture, whipped cream and sifted cocoa. Cover and refrigerate 4 hours before serving.

*I love to bake, and I would normally make a homemade pound cake if I was serving a more simple dessert, such as pound cake with fresh berries. However, since I had a busy weekend and the trifle had plenty of flavorful ingredients, a Sara Lee pound cake from frozen foods aisle worked great.

**I bought a 26 ounce bag of frozen raspberries because it was a better deal at the grocery store and ended up using the entire bag. If you and your guests like raspberries, you may want to use a few more than the original recipe suggests.

I hope you’re enjoying your holiday festivities!

Cheers!

Laura

Lunchtime Quinoa Bowl

2015-10-29 19.12.41

Confession: I’ve been getting off track with lunch recently. I am fortunate to live about a mile from work, so I frequently walk home during my lunch hour to let the dog out and grab a quick bite. It’s really ideal because I’m able to get a few steps in, take a mental break from the office, and enjoy some doggy snuggles.

However, I used to be the best at packing well balanced and filling lunches when I took my lunch to work and had to plan ahead. Now, I tend to grab just whatever is quick – some cheese and crackers, a can of tuna, a pear, some pretzels dipped in peanut butter, a cookie, whatever… I usually returned to the office feeling gross and bloated or still hungry and on the prowl for unhealthy snacks. Last week, I purchased frozen chicken nuggets and corn dogs at the grocery store because I thought that would be a great option for my grab-and-go lunches. What was I thinking?! After reaching that low point, I realized enough is enough. It is time to get back on track!

When I was single, I used to frequently make hearty quinoa bowls for dinner and then eat the leftovers for lunch. On Sunday, I decided to whip up a big batch and use it for at least three of my lunches this week. The great thing about quinoa bowls is they’re hard to mess up. Sometimes I follow a recipe, but more often than not,  I just chop up whatever veggies and herbs I have on hand and add some good olive oil, vinegar, sea salt, and pepper for a little flavor. However, this time I used a recipe I found at Kaylee Cooks.

Tomato-Basil Quinoa with Spinach and White Beans

Ingredients:

  • 1 cup dry quinoa, rinsed
  • 3 cups vegetable broth(note, this is more than you usually need to cook 1 c of quinoa, but we are also cooking the tomatoes and beans in the broth)
  • 2 cloves garlic, minced
  • 1 small onion, chopped
  • 1 cup cherry tomatoes, halved
  • 8 oz canned white beans, rinsed and drained
  • 1.5 tbsp basil
  • Salt and pepper to taste
  • 4 oz fresh baby spinach

Directions:

  1. Combine quinoa and broth in a pot and bring to a boil. Reduce to a simmer.
  2. Meanwhile, heat olive oil in a large dutch oven (or other large pan) over medium heat.
  3. Add garlic and onions; cook for 1 minute (until the onion is softened)
  4. Add tomatoes, beans and basil and cook for 3-4 minutes.
  5. Pour the pot of quinoa and broth into the tomato mixture, season and simmer on a low heat (uncovered) until the quinoa is absorbs the broth and is cooked through (You may need to add a bit more broth to finish cooking the quinoa if the broth is absorbing too quickly).
  6. Once the quinoa has finished cooking, add the spinach and stir to wilt.
2015-10-29 18.14.30

When I don’t have fresh basil in the winter, I like to use the Dorot frozen basil cubes. Locally, they can be found at Trader Joe’s, Good Foods Co-Op, and Rainbow Blossom Natural Foods Market.

2015-10-29 18.40.23

I’d love to hear your easy, go-to lunch ideas!

Cheers!

Laura

My Old Kentucky Home Renovations: Survival Tips

Last night, I was walking through our house enjoying our Christmas decorations and appreciating that we were able to decorate the entire house this year. Last year during this season, we were in the thick of home renovations, and I didn’t want to put up too many decorations because it meant extra stuff to dust daily.

Anyways, those who know me well know that I have slight anxiety issues when I’m in messy and unorganized spaces, so the months of living in the house during renovations were really difficult and stressful. Since it was a dark time, I didn’t take too many pictures, but I found a few in the annals of my iPhone. I could literally feel my breathing shallow and my blood pressure spike when I pulled them out to share with you.

I put together a list of survival tips. I geared them towards OCD folks, like myself. Here they are…

How to Survive a Renovation If You Don’t Like Messes

  1. Create renovation-free zones and keep them organized.

I can’t tell you how many times I escaped to our upstairs guest bedroom for a couple hours or closed the doors in our living room, so I wouldn’t have to look at the mess. Having a mini-haven that I could keep neat and clean inside the house was necessary to my survival.

Bedroom mess

Ain’t nobody relaxing in this mess of a bedroom.

  1. Buy Swiffer Dry Cloths in bulk.

If you’re like Danny Tanner (or me) and can’t stand dirt, these are a lifesaver. I typically like to use microfiber dusting cloths and washable dusting mop pads, but it was worth it for my sanity to use disposable dusting sheets. I used the dry cloths to dust the floors and multiple other surfaces most evenings. Sorry not sorry, Mother Nature.

  1. Multiply the estimated project timeline by four.

Getting into a renovation project, I knew that it wouldn’t be finished on time. Have you ever heard of a construction project finishing on time or ahead of schedule? No. However, I thought it would only be a couple of extra weeks. One of the most stressful things was not knowing when the project would be done and when workmen would come. I had my hopes up pretty much every week, and our project ended up taking four full months instead of the four weeks we were told. If you’re starting a project, multiply the completion time by four because then you might be pleasantly surprised if it gets finished sooner.

  1. Realize that you’ll likely go over budget.

Along the same lines, every project that we’ve done has pretty much gone over budget. In our case, the investment in higher quality items was worth it since we were already making a large investment, but we definitely considered where to save and where to splurge. For example, we used higher-end tile in our shower, but we purchased our towel racks from the hardware store (with a coupon) instead of the fancy bathroom showroom. My advice is to know what you can realistically spend and lowball your budget when talking to contractors. You’ll likely end up spending your entire budget, but maybe you won’t go over it.

  1. Have patience, and if you don’t, just leave the house.

I consider myself a fairly patient person, but that went out the window during renovations. The time, the mess, the workmen leaving trash throughout the house (even in places they weren’t working), etc. definitely shortened my fuse. I really tried to have patience, but like I mentioned, my anxiety took over, and it wasn’t pretty. My biggest advice is to leave the house. I went for a lot of runs and walks to get out of the house, and I actually looked forward to business trips. If you can plan a vacation during a particularly rough renovation, by all means, leave that mess and enjoy yourself.

Bathroom Trash

Thank you, Mr. Construction Worker, for leaving your Dr. Pepper in an already junky bathroom. I don’t even want to think about why you took that in there.

If all else fails, just pour yourself a big glass of wine. Cheers!

Laura


My Old Kentucky Home Renovations: Master Bathroom and Closet

The most dramatic change to happen to our house over the past year was the addition of a master bathroom and closet. We eliminated an existing bathroom in a different part of the house to build an office nook, so we were down to one bathroom with an antique clawfoot tub and no counter space or storage under the sink. It was pretty tight, and I can’t tell you how many times someone almost electrocuted himself because a hairdryer or curling iron in the sink since there wasn’t room for it on the counter. Additionally, we didn’t have a real closet in the house, so we desperately needed one of those as well.

We eliminated a bedroom that was adjacent to our master bedroom and serving as an office to put in the master bath and closet. The space was rectangular, which helped make the design easier. Most of our rooms have catty corners, so we were fortunate that this one did not. However, it had a fireplace and two large windows that we had to work around since we didn’t want to eliminate them.

overview

Ezra, our architect who also happens to be a friend, did a great job with the design, and he was really patient as we worked to find the best design. He put together several options for us, and I can’t tell you how long it took us to pick one and then how many times we kept coming back to him with changes and minor tweaks. I originally wanted a separate bathroom and closet, but he convinced us to go with a combined bathroom and closet. It was definitely the best use of space, and when I’m getting ready, I don’t feel like I’m putting makeup in my closet. If you are looking for an architect for a large or small project, I highly recommend Ezra Sword Designs.

Our tile came from The Tile Shop, and I really love how the shower came out. I think the marble fits well with the age of the house, but it still looks fresh and clean.

We went with a Carrara marble for our vanity counter, and again, I love it! I was really picky about the vanity color and countertop, so I drove to Stone Gallery in Nicholasville to pick out the exact slab that they used to make the counter. We had a minor (what seemed like major at the time) renovation nightmare with the stain of the vanity, and the Amish carpenters who built the vanity and other storage pieces had to keep coming back to install, uninstall, reinstall, etc., which was a hassle considering they lived over an hour away and had to hire a driver each time they made a trip to the house.

Since the space doubles as a bathroom and closet, we wanted the toilet to be in a separate room. We struggled with space and structural issues, but we finally settled on a barn door for the water closet. I didn’t want the barn door to look too rustic, so we finally settled on this hardware and had the door custom built.

Before the room became a master bath/closet, the room had a built-in bookcase with an antique ladder from a pharmacy in downtown Lexington. We kept the ladder to access the tall shelves in our closet, and we use it almost everyday.

The biggest lesson I learned from this project is to avoid cutting corners in a renovation project, which we were considering when we were in the thick of the renovation and progress was happening at snail’s pace. We use this space all the time, so I’m really happy we focused on each tiny detail.

Cheers!

Laura

My Old Kentucky Home Renovations: Dining Room

Room Overview

Our dining room is probably my favorite room in our house. We typically host a few parties as well as several family holiday meals each year, so its larger size is great for our needs. It required relatively little work to update it since it had great bones to start with. I love the white fireplace flanked by two extra-long windows. You may remember this picture from the ultimate before post last week, and while Jay changed some of the aesthetic details, I didn’t really care for his changes. Luckily, we didn’t have to do much more than paint the walls and change out the furniture and accessories.

Because the room is so large and bright, I went with a darker greige wall color. I think it makes the room feel more intimate, and since it is in the middle of the house, the color serves as a neutral base for the surrounding rooms.

Fireplace

We changed out the dining room table and chairs for a larger option. The scale of the table and chairs fits the space better, and it can be expanded to comfortably seat 8-10 guests, which is perfect for family meals or Jay’s poker games.

Jay has an extensive bourbon and Kentucky Derby glass collection, so they are displayed on an antique washstand that was obtained from an estate sale in Lexington. I collected his rogue bottles of bourbon that were scattered around the house and put them in a side cupboard with his extra derby glasses because we couldn’t come close to fitting everything on top of our makeshift bar. As a quirky twist, we added the Kentucky for Kentucky “The Kentucky Derby is Decadent and Depraved” print modeled after Hunter S. Thompson’s iconic short story, which was a gift from Jay’s brother.

Bar

Additionally, we recently inherited a couple of pieces of furniture that we’ve added to the space. One is an antique sideboard that matches the dining room table surprisingly well and provides much needed storage for some of our serving dishes. We also inherited Jay’s grandmother’s recipe box, which is a special touch. Whenever Jay says, “That tastes just like my grandmother’s (insert food here),” I know I’ve done something right.

Our second inherited item is a beaten biscuit brake. Beaten biscuits are little hard biscuits usually enjoyed with country ham that used to be popular in Kentucky and across the South. As in, your grandma’s grandma probably ate them. I’ve never made them, but I hear you have to crank that sucker for AT LEAST AN HOUR to get the biscuits just right. However, Jay is insistent that we make them for Christmas, so you may get to read a post on that later this season. Anyways, I’m not really sure how to style the table because the cranking mechanism gets in the way. I tried a vase, but it didn’t seem quite right. Currently, it serves as real estate for an iHome.

Beaten biscuit

I consider this room “in progress.” It really just needs some more accessories to complete it, but I’m waiting to find the perfect ones. The dining room opens into our living room, which has shades of olive, teal, and coral red, so I carried the red and teal into the dining room with the fabric on the chairs and the area rug. I’m currently on the hunt for some larger scale artwork with those colors as well as window treatments and a few accessories to polish off the room.

Cheers!

Laura

My Old Kentucky Home Renovations: Before

This is the exterior of our home when Jay purchased it in 2009.

This is the exterior of our home when Jay purchased it in 2009.

The past year and a half brought a lot of changes to my corner of world – engagement and marriage, a new job, the loss of a family member, adopting a dog, moving into a new (old) house, and renovating said house. I find disorderly spaces extremely stressful, so while they are definitely the most trivial things on the list, moving and home renovations were the most unnerving.

So here’s the backstory… Jay and I live in an 1880’s Victorian cottage near downtown Lexington, and we’re I’m trying to make it livable for a 21st century couple. My husband purchased the house several years before we met, and since I was renting during the time we were dating, it was the obvious choice to live in his house after we got married. Jay lived in the house for 5 years before before I moved in, which gave him 5 years to turn it into the ultimate bachelor pad i.e. fancy bottles of bourbon displayed in every room, newspaper cutouts of UK basketball players taped various places, a general lack of cohesiveness…You get the picture.

To give you an idea of what we’re working with, here are some great things about our house:

  • Great location 
  • Charm out the wazoo
  • Large foyer, family room, and dining room
  • Expansive brick patio in the fenced-in backyard

Here’s what it is lacking:

  • Large (or even medium-sized) updated kitchen
  • Storage
  • Garage

Warning: What you are about to view is downright scary. These are the pictures of the house when Jay purchased it in 2009. It is the ultimate before.

Each week, I plan to share a different piece of the renovation story. In the past 12 months, we’ve eliminated a bedroom to add a master bathroom and closet, demolished a bathroom to create an office nook, enclosed our laundry/pantry/utility room, rebuilt our front porch, added a new roof, painted several rooms, and re-landscaped 75% of the yard. While I don’t plan to knock down more walls anytime soon, I do have a lot of home improvement and decorating projects that I’m planning to tackle. Stay tuned for some “after” pictures and in-progress updates.

Cheers!

Laura